Showing posts with label Tips and Tricks. Show all posts

Saturday, March 16, 2013

Mile High Biscuits

This morning we wanted to make Biscuits and Gravy for our Saturday breakfast.  Usually, we just break out the Bisquick and make our biscuits.  It works fine, but Heather had found this recipe online this week and wanted to try it.  We are SO glad we did!  They are incredibly flaky, tender, and SO much better than from any mix we have ever tried!  Enjoy!

3 cups flour (can use 1/2 white flour and 1/2 wheat flour if desired)
1-1/2 teaspoons salt
1 Tablespoon sugar
1-1/2 teaspoons baking powder
1/2 cup butter
3/4 cup buttermilk (you can also substitute 'homemade' buttermilk- 3/4 cup milk + 2 Tablespoons lemon juice- which is what we did.  They still turn out amazing).  Feel free to also use our tip using buttermilk powder!
1 egg
1/4 cup water

Preheat oven to 425 Degrees.  Using a pastry blender or two knives, combine flour, salt, sugar, baking powder, and butter until crumbly.  Mix in buttermilk, egg, and just enough water to make a workable dough  Mix the dough until it is just barely combined (DON'T OVERMIX!)  Roll the dough to 1 inch thickness on a floured cutting board.  Cut with a 2 inch biscuit cutter (or circle cookie cutter, or round glass)  Place biscuits on a greased baking sheet, touching one another, and bake 12-15 minutes or until golden brown.  Makes about 12-15 biscuits, depending on size and thickness.

TIPS FOR AWESOME BISCUITS:

  1. ONLY hand mix your dough!  Don't bother with your fancy Bosch or Kitchen-Aid mixer on this recipe.  Go old school.  If you use your mixer, your dough will become too dry.
  2. Don't over mix!  The best way to mix the dough is with a pastry blender or two knives, cutting the dough back and forth.  This method takes a bit longer, but will ensure the perfect biscuit.  You want little pieces of butter throughout your dough.  This is the secret to light and flaky biscuits!
  3. Keep your dough fairly thick (1 to 1-1/2 inches).  A tall and thick biscuit is much better than a thin and hard one.  Keeping it thick will ensure a soft, chewy, delicious biscuit. 


Tuesday, February 26, 2013

Cheese Ball

Everybody tends to break out their favorite cheese ball recipe during the holidays.  This is our favorite version, from our friend Sarah Feil.

1- 8 oz. package cream cheese, softened
1/2 cup butter, softened
1/2 cup finely grated cheddar cheese
3 green onions, finely chopped
4 to 5 black olives, chopped, or 1 small can chopped olives, drained
garlic powder, to taste
chopped walnuts

Beat cream cheese and butter together until combined.  Fold in remaining ingredients except walnuts.  Form into a ball, wrap in plastic wrap and refrigerate until firm.  Just before serving, unwrap ball and roll in chopped walnuts to coat.  Serve with your favorite crackers and/or fresh vegetables. 

Saturday, February 9, 2013

April's Pancakes

Lately, Heather and I have tried to cook from scratch a little bit more.  It does take a tad bit more time, but it isn't too bad if you plan ahead just a little bit.  We realized that it was expensive buying all different kinds of convenience foods and mixes to make things, when we really had all the from-scratch ingredients on hand anyway.  Not only does cooking from scratch save money, but also makes you feel like you're eating a little bit healthier too, with less preservatives, additives, salt, etc.  Heather's sister April introduced us to these pancakes.  They are SO easy, and now we can push the cart directly past the Krusteaz pancake mix at Costco with confidence.  Also, this recipe makes about a dozen pancakes, which is PERFECT for our family.  No more wasted leftover pancakes!

1-1/2 cups flour (feel free to use whole wheat flour!)
1 teaspoon salt
1 Tablespoon baking powder
2 Tablespoons oil
2 eggs, separated
1-1/2 cups milk

In a large mixing bowl, combine flour, salt, baking powder, oil, egg yolks, and milk.  With an electric hand beater (or exceptionally strong arm) beat egg whites in small bowl until soft peaks form.  Gently fold egg whites into batter.  Pour batter by 1/4 cup-fuls onto hot greased griddle. 

Makes about 12 pancakes

Tuesday, July 24, 2012

Chocolate Eclair Torte

Everybody loves Chocolate Eclairs, right?  However, making the vanilla custard filling and chocolate ganache from scratch and messily filling pastries can be time consuming and delicate work.  Well, here's a recipe that has all the eclair flavor (with a few handy shortcuts) in an easy to make cake!  We hope you love it as much as we do!

1 cup water
1/2 cup butter
1/4 teaspoon salt
1 cup all-purpose flour
4 eggs
1 package (8 oz.) cream cheese, softened
3 cups cold milk
2 packages (3.4 oz. each) instant vanilla pudding mix
1 carton (12 oz.) Cool Whip, thawed
2 to 4 Tablespoons chocolate syrup

In a small saucepan over medium heat, bring the water, butter and salt to a boil.  Add flour all at once and stir until a smooth ball forms.  Remove from heat; let stand for 5 minutes.  Add eggs, one at a time, beating well after each addition.  Continue beating until mixture is smooth and shiny.

Spread mixture into a greased 9x13 baking pan.  Bake at 400 degrees for 30-35 minutes or until puffed and golden brown.  Cool completely on a wire rack.  If desired, remove puff from pan and place on a serving platter. 

In a large bowl, beat cream cheese until light and fluffy.  Add the milk and pudding mix; beat until smooth.  Spread over puff; refrigerate for 20 minutes.  Spread with the Cool Whip; refrigerate.  Drizzle with chocolate syrup just before serving.  Refrigerate leftovers.  Serves 12. 

Source:  Taste of Home Most Requested Recipes

Tuesday, July 10, 2012

Traditional Haws Family "Sugar n' Cinnamon Cereal"


In my (Aaron's) family, there has always been a tradition:  "Sugar n' Cinnamon cereal."  It is a simple concoction consisting of Cream of Wheat, sugar, and cinnamon, spread on a plate.  My mom loved Cream of Wheat when she was little, and so my Grandma would make it often.  However, my mom didn't like that it took forever to cool.  So, my genius Grandma spread it on a plate so it would cool faster.  Thus the tradition was born!  My mom made it for me, and I loved sprinkling cinnamon and sugar over the whole thing.  The sugar melts into this yummy liquid "goo" over the surface, and it is sooooo good!  You just simply eat the cereal in a "spiral" starting from the outside because it cools faster on the edges.  I love the fact that I have now passed this tradition on to our kids!  So, the next time you make plain Cream of Wheat, try it this way!  It just may become your new favorite!  :-)

Monday, January 16, 2012

Favorite Haws Family Pizza

We love pizza. However, takeout gets old, and this recipe tastes much better than some $5 hot-n-ready deal! What even makes this easier is that we make the dough in the bread machine, so you don't have to deal with kneading and rising! SO easy! This dough recipe actually came with our bread machine, and the sauce is another amazing miracle from "our best bites!" (you'll never resort to using bottled marinara sauce on pizza EVER again)!

DOUGH VARIATIONS:

1 Lb. recipe (Makes 1 thick or 2 thin crusts):

3/4 cup warm water
1 Tablespoon oil
1 Tablespoon sugar
1-1/2 teaspoons salt
1 Tablespoon dry milk powder
2-1/4 cups bread flour
1 teaspoon active dry yeast

2 Lb. recipe (Makes 2 thick or 4 thin crusts):

1-2/3 cups warm water
2 Tablespoons oil
2 Tablespoons sugar
2 teaspoons salt
2 Tablespoons dry milk powder
4-1/2 cups bread flour
2 teaspoons active dry yeast


1 lb Whole Wheat Recipe (makes 2 thin crusts):

1 cup warm water
2 Tablespoons oil
1 Tablespoon sugar
1 teaspoon salt
1 cup whole wheat flour
1-1/2 cups bread flour
1 teaspoon active dry yeast

Place all ingredients in bread machine in order listed, then select "pizza dough" cycle and loaf size if you have that feature. (If you don't have pizza dough cycle, just use "dough" cycle). Depending on your climate and elevation, check dough after 5 minutes of mixing. If dough looks dry and crumbly, add a tablespoon or two of water. If it looks too wet and sticky, add a tablespoon or two of flour).

When dough cycle is complete, turn out on a lightly floured surface. Divide and press onto a 12 inch pizza pan, raising edges. Top with sauce (Below):

PIZZA SAUCE:

1 (6-ounce) can tomato paste
6 ounces water (just use empty tomato paste can)
3 Tablespoons Garlic Bread Seasoning (see next post below)
1 Tablespoon sugar or honey
3/4 teaspoon onion powder
1/4 teaspoon red pepper flakes (optional)

Empty tomato paste into a bowl and add water a few tablespoons at a time, stirring constantly until combined. Add remaining ingredients, stir to combine, and allow to stand until ready to use. (Covers two average-sized pizzas.)

Finish pizza with mozzarella cheese and desired toppings and bake at 425 for 20 minutes or until crust is golden brown around edges.

Garlic Bread Seasoning

So, how many times have you caught yourself buying expensive garlic bread seasonings in the store? (It's OK, you can raise your hand, nobody's watching!) We found another great "our best bites" find for this stuff from ingredients you likely already have on hand, and we pledged will NEVER buy it again! We just shake it together in a jar and keep it in the fridge, and use it ALL the time. It'll keep for 3 months refrigerated. (You also use it for the pizza sauce recipe in the previous post).

1/2 cup powdered Parmesan cheese
2 teaspoons kosher salt
2 Tablespoons garlic powder
2 teaspoons oregano
2 teaspoons basil
2 teaspoons marjoram
2 teaspoons parsley

Shake ingredients together in an airtight container and store in fridge. THAT'S IT! :-)

Sunday, October 16, 2011

Brown Bag Burritos

Another Taste of Home find! I have been looking for lunchtime solutions lately that are quick to fix, so when I have a moment to eat during the day, I don't just look blankly in the fridge, shrug my shoulders, and make myself another lame sandwich. These frozen burritos rock! I especially love them because I can take them to school with me in my insulated lunch pack, then microwave when I get there. They're ready anytime, and they're really tasty!!!

2 lbs. Ground Beef
2 Cans (16 oz. each) Refried Beans
3 Cups (12 oz.) shredded mexican cheese blend, or cheddar cheese
1-1/3 cups enchilada sauce
1/2 cup water
1/3 cup chopped onion
2 Tbsp. chili powder
1 tsp. salt
16 flour tortillas - 10 in. - warmed

Optional toppings:
shredded mexican cheese blend/cheddar cheese
sour cream
shredded lettuce
chopped tomatoes
sliced olives

In a dutch oven or large pot, cook ground beef over medium heat until no longer pink; drain. Return to pan; add the beans, cheese, enchilada sauce, water, onion and seasonings. Bring to a boil. Reduce heat; cover and simmer for 10 minutes.

Spoon 1/2 cup filling off center on each tortilla. Fold sides and end over filling and roll up. Wrap individually in paper towels, then foil. Transfer wrapped burritos to a resealable plastic freezer bag. May be frozen up to 2 months.

To use frozen burritos:
Unwrap foil. Place paper-towel wrapped burritos on a microwave-safe plate. Microwave on high for 3-4 minutes or until heated through. Serve with toppings of choice.

16 burritos.

Source: Taste of Home

Wednesday, May 25, 2011

Amazing 15 Minute Meal: Creamy Tortellini Marinara

Every once in a while, you happen to come across a meal that is a life saver that you can whip together in a hurry and avoid the dreaded "I don't know what to make fast, so lets go get McDonald's" nights. This is one of them that we made last night. Literally this comes together faster than it takes to get the kids to set the table. Toast up some garlic bread from the grocery store and open a bag of salad, and you've got a meal!

1 9-oz. package refrigerated cheese tortellini
2 garlic cloves, minced
2 Tbsp. butter
4-1/2 tsp. flour
1 cup milk
1 15-oz. jar marinara sauce
4 oz. cream cheese, cubed
2 green onions, sliced - (we didn't have green onions on hand when we tried it, so we just threw in some dried minced onion).
salt and pepper to taste

Cook tortellini according to package directions. Meanwhile, in a saucepan, saute the garlic in butter for 1 min. Stir in flour. Slowly add milk and bring to a boil. Add marinara sauce, cream cheese, green onions, salt and pepper. Cook and stir until cheese melts. Serve over tortellini.

6 servings.

Source: Taste of Home June/July 2011

Tuesday, May 10, 2011

Our Amazing Kitchen Discovery


Ok, so have you ever seen this stuff in your Mom's or Grandma's pantry? I did too, but I never really what it was or what it did. WELL, I saw on a website what you actually do with it. This stuff is actually powdered buttermilk!


So, we've all had this experience, i'm sure: we want to make pancakes, breads, etc. that call for buttermilk. We open the fridge, and the buttermilk that was there was expired, curdled, and nasty. We don't want to make an unneccessary trip to the store for more. Well, now you can make your favorite buttermilk recipes without having to worry about having buttermilk on hand all the time!


Here's what you do. . .


When recipe calls for:


2/3 cup buttermilk: use 2-1/2 Tbsp. powder, and 2/3 cup water


1 cup buttermilk: use 4 Tbsp. powder and 1 cup water


To use it: First mix the measured buttermilk powder (above) with the other dry ingredients in your recipe, then add the appropriate amount of water when the recipe calls for liquid buttermilk. It's that easy!!


The can will store unopened on your pantry shelf for about 3-4 years or so, but they recommend refrigerating once the can is open.

Some of our favorite buttermilk recipes from this blog include our favorite pancake syrup, and Aebleskivers


ENJOY THIS TRICK!!!!

Thursday, April 28, 2011

Bread Machine Cinnamon Rolls


I love cinnamon rolls, and while Heather does too, we dislike the mess that they make, and the endless cycles of kneading, rising, etc. It can be really time consuming and labor intensive. Well, we discovered that all that is easier when you let your bread machine do the work! All you do is roll out the finished dough, let rise once, and bake!


DOUGH:

1 egg, room temperature, PLUS enough lukewarm water to equal 1 cup

3 Tbsp. vegetable oil

1/3 cup sugar

1-1/2 tsp. salt

3-1/2 cups bread flour

2 tsp. active dry yeast


FILLING:

1/3 cup butter, melted

1/4 cup sugar

2 Tbsp. cinnamon

1/4 cup finely chopped walnuts (optional)

1/4 cup raisins (optional)


GLAZE:

1/2 cup powdered sugar

3 Tbsp. milk

1/2 tsp. vanilla


For dough, place all ingredients in bread machine pan. Select dough cycle. Set loaf size for 1-1/2 pounds (if using a variable loaf size bread machine). Push start. Check dough after 5 minutes of mixing. If too sticky, add a teaspoon or so of flour. If too dry, add a teaspoon or so of water.


When cycle is complete, place dough on a lightly floured surface. Roll into a 12-inch by 6-inch rectangle and brush with butter. Combine remaining filling ingredients and sprinkle over butter. Roll up tightly, jelly-roll style, starting with a long side. Pinch seam to seal and cut roll into 1-inch slices.


Place slices onto a greased baking pan, about 1/2 inch apart and let rise in warm place for 30 minutes or until doubled in size. Bake at 350 for 25 to 30 minutes or until golden brown. Let cool sightly. Mix glaze ingredients together and drizzle over rolls while still warm.

Friday, March 4, 2011

Oreo and Ritz Cracker Pops


When I was growing up, I had one of those super cool Moms who made the thing that no one else was. I have seen several versions of the Oreo sucker or "pop" out there, but so far these are the best. They are easy, they hold together well and they are delicious. Besides, they have a lot of years of experience behind them, and nothing can beat that!

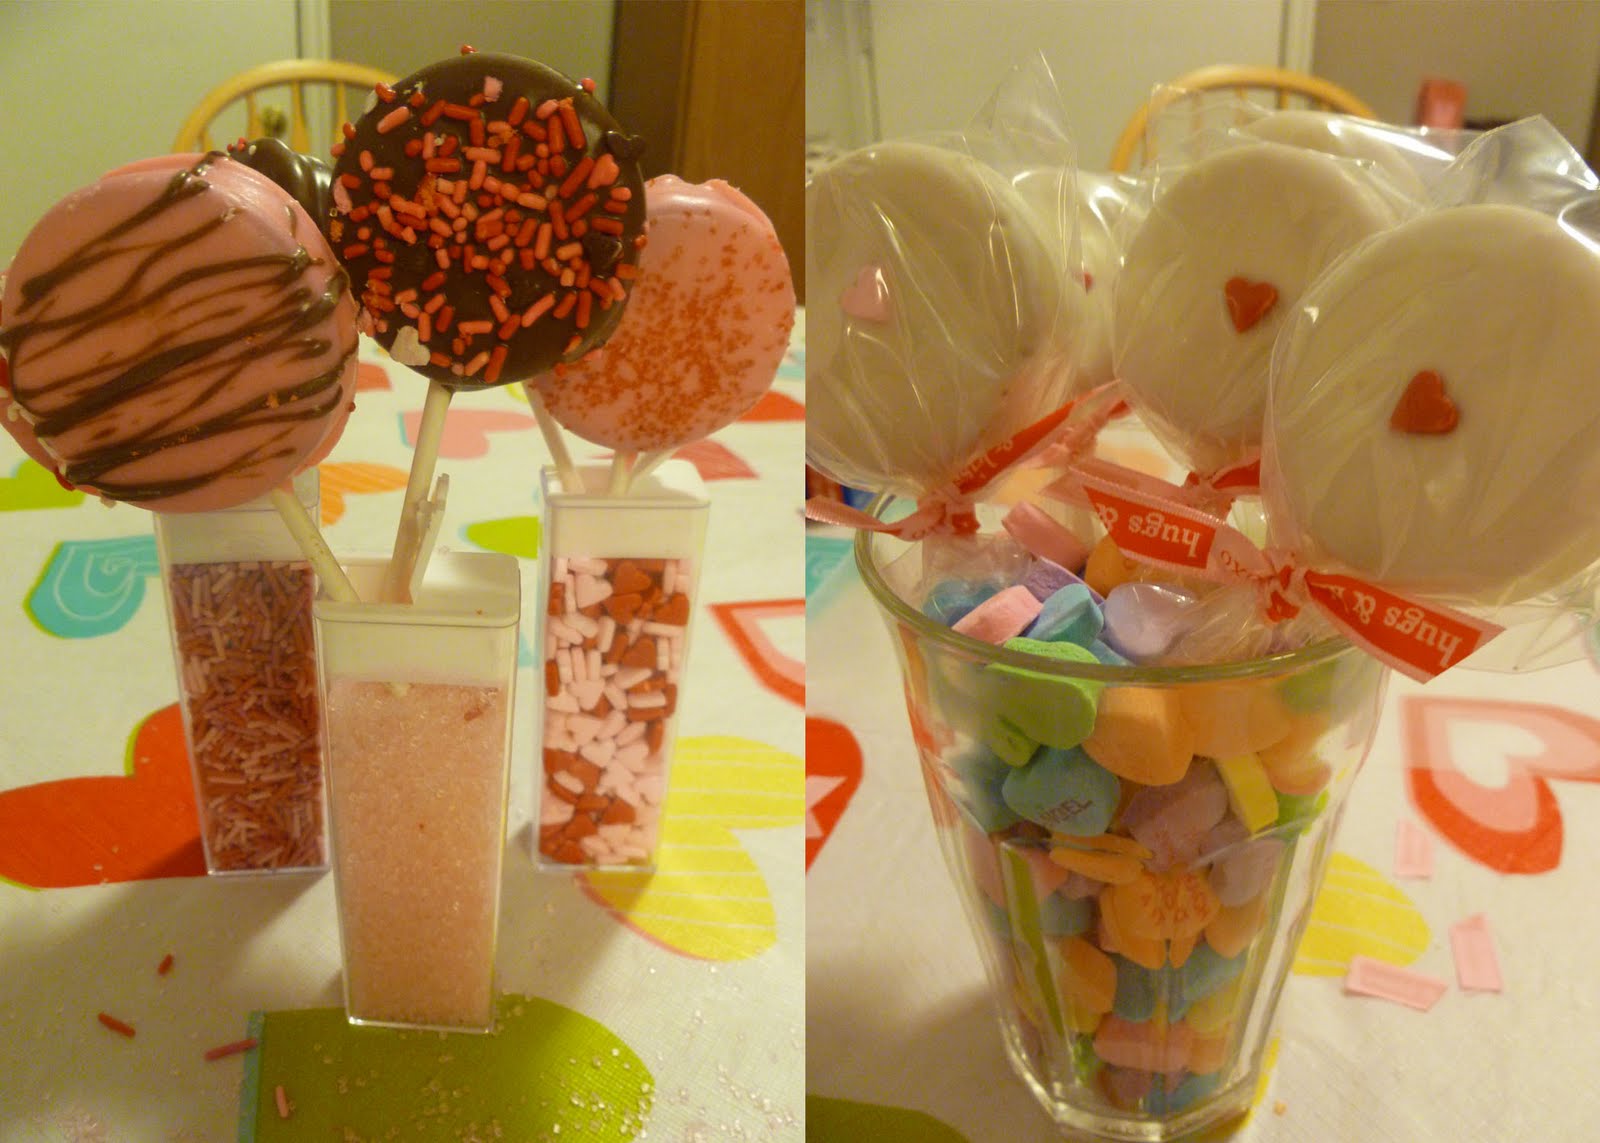
I haven't yet seen a Ritz cracker version so you'll have to take my word for it.... they are surprisingly delicious. I know what you're thinking. You're thinking, "what! A Ritz cracker? No way is that good." Well my husband said the same thing until I made him try it and now he loves it just as much as I do. In fact the Ritz cracker version was my favorite growing up. I know this recipe is a little behind schedule, obviously, but I still wanted to share it with you all. I made these to go with my daughters Valentines at preschool. The greatest thing about them is that they are inexpensive to make, so you can make a lot of them for very little! I remember my Mom made different versions throughout the year. For Easter she would put a sugar duck or bunny on top. So, ready to find out how to make your own Oreo and Ritz cracker pops? Well, here we go! Oh, and if you can't tell, the Oreo Pops are the picture on the left and the Ritz cracker pops are on the right. OK now, here we go!

RITZ CRACKER POP

Ingredients:

Ritz Crackers

Prepared Lemon Icing (I use the Betty Crocker one)

White Candy Melts (you can use almond bark, but I prefer the melts)

Sucker stick

Any candy or sugar embellishment

Directions:

1. Ice the back of a Ritz cracker. You really can't have too much icing, but you know, don't over do it. Place a sucker stick in the middle and then top with another Ritz cracker. Don't press down really hard because you'll break the cracker. Just enough so it will stick.

2. Repeat step one until you have as many pops as you would like. Then either let them set out until the frosting is firm enough to not fall apart, or to speed up the process you can put them in the refrigerator. This is what I would suggest doing.

3. Once the cookies are set up, Melt your white chocolate. Dip the cookies in the white chocolate, covering completely. This can get a little tricky. You really need to be as gentle as possible. Get off as much excess chocolate as possible. Place on wax or parchment paper to dry and set. If you want to add an embellishment, do so before the chocolate sets.

4. Once dry, everything holds together beautifully! I promise! I found some sucker bags at Wal-Mart, so I just packaged them up and tied them with a ribbon. You're all set to go! And believe me when I say that your kids will be the coolest ones in their class if they pass these little beauties out!

OREO POP

Ingredients:

Oreo Cookies

Any Color of Candy Melts (you can use chocolate or almond bark, but I prefer the melts)

Sucker stick

Any candy or sugar embellishment

Directions:

1. OK, so most people have a really hard time getting the stick into the middle without breaking the cookie, so here is the trick. You could buy Double Stuff Oreos, but it isn't completely necessary. Just take your cookies and put them in the microwave for about 5 to 10 seconds. If the middle is still not soft, microwave them again. It varies by microwave so I can't tell you an exact time. Once the middle is semi-soft, but not totally melted (watch that, it gets a little messy!) Slide your sucker stick into the middle.

2. Repeat this step until you get the number of cookies that you want. Put the cookies aside to firm up, or, to speed up the process, place them in the fridge. Make sure you don't skip this step no matter what. If you do, your cookie will most likely fall apart during the chocolate dipping. Don't ask how I know that, just take my word for it!

3. When the cookies are firm, melt your chocolate. I used Semi-sweet chocolate melts and white chocolate melts that I colored pink (the pink candy melts were gone - but they literally make almost every color!) Once melted dip your cookies into the chocolate, covering completely. Be as gentle as possible as you get off as much excess chocolate as you can. Place onto Wax or Parchment paper and let them dry. At this point, place any embellishment that you would like onto the cookie.

4. Once the chocolate is set you can package them up and give them out. I again used the sucker bags from Wal-Mart and ribbon. Once again, be prepared for the compliments, the adulation's, the praise, the.....well you get the picture!

Happy Making!

Monday, January 31, 2011

Apple Pie Filling


I love the fall. All those apples and the millions of things you can do with them. One thing in particular is the smell of apple pie. It's a warmth and smell that just fills your house with goodness. It's also a great time to get all that canning done that you've been meaning to do all summer, but have put off until the last possible second!?! No of course not, we are all perfect housewives who get all the ironing, cooking, cleaning, laundry, watching the children, running errands and darning done in one day. And if you don't know what darning is... well, never mind then, you must be the perfect housewife if you never have to darn a thing!


So anyway, I just really wanted to post this recipe before I lose it again in my perfectly clean house. (you can't see me right now, but I'm rolling my eyes) This recipe has nothing to do with the season. In fact you won't be able to use this recipe for probably a good...well when fall comes around again. It is delicious when you bake it into a pie and it would even be great warmed up and served with ice cream. It is easy to can, even for the newbie!


Ingredients:

Apples
1 cup corn starch
dash of cloves
4 1/2 cups sugar
1/4 teaspoon nutmeg
3 teaspoons cinnamon
10 cups water

Directions:

  • Peel, core and slice your apples. Place into jars, filling the jar to just the bottom of the rings.
  • Mix together the corn starch, cloves, sugar, nutmeg and cinnamon.Add 10 cups water to the dry ingredients and mix well.
  • Boil the mixture until the sugar dissolves.
  • Pour over jarred apples.
  • Process for 20 minutes

Makes 7 jars

  • Tips: Don't boil your mixture too fast. Gradually bring it to a boil. I think it gets too thick too fast otherwise.
  • I like to use my apple peeler/corer. They aren't expensive and they make the job go so much faster. Then all you have to do is slice the apples.

source: Claudia Clayson via April Clayson

Thursday, October 21, 2010

Halloween Menu


Because Halloween is on a Sunday this year, I decided that I wanted to make it special since we won't be trick-or-treating on that day. If you are like me, you have struggled to come up with a fun, yet not too creepy, but delicious, and something the kids will eat - meal to serve. It was especially difficult because everything that you find is usually an appetizer type food. Since we are having a few friends over for a sit-down dinner, I can't really just serve finger foods for the meal. Finally I have figured out what I am going to do. I wanted to share it with all of you so that if you are still looking, maybe I can help out with your meal plans.
Breakfast:
  • Pancakes made into Halloween shapes
  • Sausage "Fingers"
I came up with this idea when I was first introduced to Jim's Pancakes by a family member and then later when he appeared on the Rachel Ray show. His pancakes are awesome! I thought, "hey, I can do that!" So we will be attempting these pancakes in the morning.
Lunch
  • Ghost of Monte Cristo Sandwiches. (Picture 5 above)
  • PB&J sandwiches cut into shapes or Hot dog mummies. (Pictures 2 and 7)
The Monte Cristo will most likely be for the adults that will be visiting with us for lunch. I haven't quite decided between the mummies or the PB&J's, but these are for the kiddos.
Dinner:
  • Martinelli's Apple Cider with eye ball drink stir-ers (found at Wal-mart)
  • Mummy Meatloaf (picture 1 above)
  • Mashed Boo-tatoes (picture 4 above)
  • Slivered Scream Beans (picture 6 above)
  • Witches Fingers (Bread sticks)

Ever since I first saw this meatloaf I wanted to make it. Everything else is really all about how you present it.

Dessert:
  • Brain Cupcakes (picture 3 above)
  • Homemade Oreos with Orange filling
  • Candy Corn Trifles

We are having so many desserts because I want people to be able to choose what they want. We are also putting the kids to bed and then watching some type of scary movie - it is after all Halloween! I just want everyone to be fed and happy, plus the sugar will help keep all the adults awake!

The Oreos are our own recipe found here! For other really great ideas visit Family Fun and Martha Stewart. They have some really great entertaining ideas and awesome things that you can do with your kids! Good luck and Happy Halloween!

Tuesday, September 7, 2010

A Useful Tool - The Citrus Press


I have recently rediscovered the usefulness of this tool. The Citrus Press. For a long time whenever I need fresh lemon juice I just use my good old hand to squeeze the juice out. I can never seem to get all the juice out. So I finally pulled out this beauty. It gets out all the juice and it keeps me from having to fish out the seeds. It is an inexpensive tool that will be useful for years to come.

Tuesday, July 6, 2010

Easy Entertaining Idea: Trifle Bar!!!!!


This year for the fourth of July, Heather and I wanted to try something different and delicious for a dessert. A while ago, I read in Taste of Home about the idea of a trifle bar. I thought this would be fun. So we tried it, and it was a HUGE success for our barbecue, and very delicious! Plus, it was so little work, it made the day even better! For those non-triflers out there, according to google, a trifle is defined as: "a dessert dish made from thick (or often solidified) custard, fruit, sponge cake, fruit juice or, more recently, gelatin, and whipped cream. These ingredients are usually arranged in layers with fruit and sponge on the bottom, and custard and cream on top." We put out individual serving dishes for our guests, along with dishes of brownie cubes, angel food cake cubes, strawberries, blueberries, raspberries, vanilla pudding, and cool whip, and let them go to town. Since this was 4th of July, we went with the red-white-blue thing, but you can let your imagination go wild! Here are some suggestions:

Cakes:
Frozen (or homemade) pound cake cubes
Chocolate Cake cubes
Angel Food Cake cubes
Brownie Cubes
Yellow Cake Cubes
White Cake Cubes

Fruits:
Strawberries
Blackberries
Raspberries
Blueberries
Blackberries
Banana Slices
Mandarin Orange Segments
Kiwi Slices

Sauces/Custards:
Vanilla Pudding
Chocolate Pudding
White Chocolate Pudding
Cheesecake Pudding
Banana Cream Pudding
Favorite jam or jelly
Chocolate or Caramel Sauce

Toppings:
Whipped Cream/Cool Whip
Yogurt
Raspberry Whipped cream (if you want to get extra fancy!) To make raspberry whipped cream: take one 10 oz. tub of frozen sweeetened raspberries in syrup, thawed, blend in blender for 30 seconds until pureed, strain and discard seeds, and stir in one 8 oz. tub of Cool Whip, and voila! Instant raspberry cream! :-)

Tuesday, January 19, 2010

TIP: Use your pizza cutter!

We have discovered that with two small girls around the house, we are constantly cutting food into "bite size chunks" for little hands to handle. We used the standard knife and fork a lot, but it was kind of time consuming, especially with sticky foods. Well, we discovered a trick that somebody mentioned in Quick Cooking Magazine: Try the pizza cutter!! So we did, and were amazed. French toast? Swipe, swipe, swipe! Done! Pancakes? Waffles? Eggs? Grilled Cheese Sandwich? Quesadilla? You get the picture. So, this has become the most versatile cutting tool for food in our house, and we have essentially "reinvented" the pizza "wheel". We hope you enjoy discovering new uses for this age-old favorite kitchen utensil that may be collecting dust in your kitchen drawer, too!


Wednesday, October 14, 2009

TIP: Our dinner roll reheating secret

Ok, so the other night I found a ziploc bag in the freezer of from-scratch crescent rolls that Heather made several months ago. I wanted to heat them up to go with our soup, but who likes the flavor of "freezer burnt" leftover rolls? Suddenly I remember a tip that my Dad SWEARS by.
My Dad used to buy these rolls from Vior's Italian Bakery in Santa Barbara by the gross. We ate them all the time, and we always had these rolls in the freezer. To reheat them and give them that fresh baked taste, he would take a paper grocery bag, put as many rolls as he wanted to warm in it, roll the bag down to close it, and douse the bag with water (just a few quick passes under the faucet.) He then put the bag into a 350 oven for 10-15 minutes. The rolls would be nice and soft on the inside and lightly crispy on the outside. The rolls taste totally fresh baked. AMAZING!
So, the next time you make a ton of dinner rolls such as at Thanksgiving, freeze them and remember this tip to reheat them months later for that fresh baked taste!!

One more thing to remember, try not to let the bag touch the sides, top or bottom of the oven. . . you don't want it to catch fire. That's what the water is designed to help prevent, but still, be careful!!! :-)