This delicious dip quickly became one of our favorite Mexican appetizers! Interestingly enough, it just happened to pop up on one of the facebook recipe pages Aaron follows, so we decided to try it. It is DELISH! If you like it spicy, feel free to add a can of chopped green chiles to the mixture, or substitute spicy jalapeno refried beans for the regular. :-)
1 (8 ounce) package cream cheese, softened
1 cup sour cream
2 cans (16 ounces each) refried beans
1 packet (1/4 cup) taco seasoning
2 cups shredded cheddar cheese
2 cups shredded monterey jack cheese
Preheat oven to 350. Mix cream cheese and sour cream together in a large bowl. Stir in refried beans until combined. Stir in taco seasoning.
Spray a 9x13 baking dish wih nonstick cooking spray, and spread mixture evenly in pan. Sprinkle both cheeses over the top. Bake in preheated oven for 25-30 minutes, or until cheese is melted and slightly browned around edges. Serve with tortilla chips.

Showing posts with label Party Ideas. Show all posts
Showing posts with label Party Ideas. Show all posts
Tuesday, April 30, 2013
Tuesday, February 26, 2013
Chex Scotcheroos

6 cups Rice or Corn Chex
1 cup light corn syrup
1 cup sugar
1 1/2 cups peanut butter
2 cups semi-sweet chocolate chips
2 cups butterscotch chips
1/2 cup peanut butter
1 teaspoon vanilla
Grease a large round bowl and pour the cereal in. Set aside. Grease a 9x13 inch pan. Set aside.
In a pan on the stove, combine the corn syrup and sugar. Stir over medium high heat until it comes to a boil. Immediately remove from heat and stir in 1 1/2 cups of peanut butter. Immediately pour this mixture over the cereal and fold in. Pour into the 9x13 pan.
In a microwaveable 4 cup measuring cup (or other microwave save dish) combine the butterscotch chips, chocolate chips, 1/2 cup of peanut butter, and vanilla. Microwave for 30 seconds at a time, stirring very well after each interval, until it is completely melted and smooth. It should take about 1 minute and 30 seconds. Pour over the bars. Allow to cool completely at room temperature before cutting.
Wednesday, October 19, 2011
Cinnamon Bun Popcorn

I am always looking for a great popcorn recipe. I just think that popcorn is so versatile and you can do so much with it. I was lucky to come across this recipe from Our Best Bites. It is fantastic and totally worth the time that it takes to make it. It is a huge hit with everyone and great for parties.
Cinnamon Caramel Corn with Pecans & White Chocolate
{AKA Cinnamon Bun Popcorn!}
{AKA Cinnamon Bun Popcorn!}
Ingredients:
12 C popped popcorn (about 1/2 C kernels)*
1 C roughly chopped pecans
1 C brown sugar
3/4 t cinnamon
1/4 C Karo syrup (or honey makes a good substitution)
1 stick real butter (1/2 C)
1/2 tsp. baking soda
1 tsp. vanilla
3 squares almond bark
*You can use air popped or microwave popcorn. If using microwave, anything works, but I prefer a "natural" flavor that's low in butter and salt.
1. Preheat oven to 250 degrees
2. Place popcorn and chopped pecans in a large bowl and set aside. And by large bowl, I mean like, twice as big as you think you really need. If you don't believe me, then maybe you will believe the scorching hot caramel goo that's splattered all over your hands while you're stirring in your not-so-big bowl. Just a thought.
3. Combine brown sugar and cinnamon in a big, microwave-safe bowl. Like a 2-quart bowl or Pyrex measuring bowl. It's really important to incorporate the cinnamon into the brown sugar at this point. For some reason, if you don't it does crazy things. I don't know why. Try it and then email Alton Brown and ask him if you really want to know.
4. Chop butter into chunks and place on top of sugar mixture. Pour corn syrup (or honey) over the top of everything. Microwave on high for 30 seconds (just to soften the butter a bit) and then stir to combine.
5. Return to microwave and heat for 2 minutes.
6. Remove and stir and then microwave for 2 minutes more.By this point it should be nice and bubbly. If it doesn't quite look like that you can microwave it a little longer, but just beware that if you over cook it, it will reach the hard candy stage and you'll end up with a giant clump of tasty concrete-like substance with little popcorn pieces stuck to it. Don't ask me how I know this.
7. Remove from the microwave and add in vanilla and baking soda. Now take that foamy science project and pour it right over the popcorn and pecans.
8. Stir right away, and stir lots. Take too long and the caramel will harden on you. Keep stirring until everything is well coated.Spread popcorn mixture onto a foil-lined jelly roll pan.Place in oven and bake for 30 minutes, stirring every 10 minutes.
9. After 30 minutes, take a piece out and let it cool. "Sample." If it's not crunchy enough, bake for another 5 minutes. "Sample" again. This will not be the end of "sampling."When it's done, give it a final stir and let it cool off for a bit while you melt your almond bark (just nuke it in the microwave according to the package directions) If you want, you can spread out your caramel corn on a clean piece of parchment, waxed paper, or foil.
10. Now, just use a fork and drizzle the melted almond bark over the popcorn mixture.When it's hardened (pop it in the fridge to speed that process along) break into chunks and enjoy!
Source: www.ourbestbites.com
Sunday, October 16, 2011
Peanut Butter Cereal Bars

Ok, so for those of you who don't know, Heather has an absolute obsession with Rice Krispie Treats. This is her ABSOLUTE favorite thing to munch on. Period. So, to no surprise, we recently received our latest Taste of Home issue, and I was thumbing through it, (unaware she was reading) when Heather let out a gasp behind me, and I hear a "wait! go back!" She saw these bars in the picture, and her pregnancy cravings kicked in with multiple oohs and yums. 1/2 hour later, I returned from a late night trip to the store with Peanut Butter Cap'n Crunch in hand. The bars were devoured in record time by both of us, with lots of sticky fingers. Perfect late night snack (pregnancy or anytime!)
30 large Marshmallows
3 Tbsp. Butter
1 Tbsp. Peanut Butter
6 Cups Peanut Butter Cap'n Crunch Cereal
1-1/2 cups Milk Chocolate Plain M&M's
In a large saucepan, combine the marshmallows, butter, and peanut butter. Cook and stir over low heat until melted. Remove from the heat. Stir in the Cereal and M&M's. Pat into a 9x13 pan coated with cooking spray. Cool. Cut into bars.
Thursday, August 11, 2011
Crunchy Ice Cream Dessert
Ok, this recipe is INDEED a find!!! One of Heather's friends served something like this to us several years ago, and she wouldn't tell us the recipe, only that it "had Chex in it." I have been wondering what exactly was in it for a long time. . . (fast forward to last week). . . we were unpacking our new house in Boise, and it was HOT outside. I happened to open up our cookbook box, and came across our Taste of Home "Cool and Creamy" book. I asked Heather if she wanted to try something with ice cream to celebrate the new house. She gave me a quick nod, and I opened up the book, and this recipe jumped right out. I was so excited because the picture looked like "that ice cream thingy with the Chex" that we tried so many years ago! I quickly jumped in the car and ran over to the store and bought a couple things, came home and made it. I'm not sure if it's the EXACT recipe that Heather's friend made, but it's really close. Needless to say, our first night in our new house, Heather and I lazily flopped on the couch after our unpacking marathon and had three pieces each. It was THAT good.
2 Cups crushed Rice Chex
2/3 cup packed brown sugar
1/2 cup chopped peanuts
1/2 cup flaked coconut
1/2 cup butter, melted
1/2 gallon vanilla ice cream
In a large bowl, combine the cereal, brown sugar, peanuts and coconut. Drizzle with butter; stir until combined.
Press half of the mixture into an ungreased 9"x 13" dish. Cut ice cream into 3/4 in.-thick slices*; arrange evenly over crust. Top with remaining crumb mixture; press down lightly. Cover and freeze until serving. Yield: 12-15 servings
*If you don't want the mess from cutting your ice cream (like we did), we just softened it a bit and spread it over the crust. Spread very slowly and carefully though, so you don't pull up the crust off the bottom of the pan. Keep in mind you will also need to freeze it longer (probably overnight) before serving if you do this so it can harden.
Source: Taste of Home Cool and Creamy
Friday, May 20, 2011
Pistachio Cake

So this is another yummy treat that we discovered some time ago. Unfortunately, like many recipes before, we ate the whole thing before we could get a picture. . . so we had to make it again just so we could get one! This moist bundt cake has has the perfect amount of sweetness, and is also a really cool shade of green, so it would be PERFECT for St. Patrick's day.
1 pkg. (18-1/4 oz.) yellow cake mix
1 pkg. (3.4 oz.) instant pistachio pudding mix
4 eggs
1 cup club soda
1/2 cup canola or vegetable oil
1/2 cup chopped walnuts
ICING:
1 cup cold heavy whipping cream
3/4 cup cold milk
1 pkg. (3.4 oz.) instant pistachio pudding mix
2 tsp. powdered sugar
1/2 cup chopped walnuts
In a large bowl, combine the cake mix, pudding mix, eggs, soda and oil; beat on low speed for 30 seconds. Beat on medium 2 minutes. Stir in walnuts
Pour into a greased and floured 10-in fluted tube (bundt) pan. Bake at 350 for 40-45 minutes or until a toothpick inserted near the center comes out clean. Cool for 10 minutes before removing from pan to a wire rack to cool completely.
In a large bowl, beat the cream, milk, pudding mix and powdered sugar on high until stiff peaks form. Frost cake. Sprinkle with Walnuts.
Yield: 12 servings
Source: Taste of Home Simple and Delicious February/March 2011
Friday, March 4, 2011
Oreo and Ritz Cracker Pops
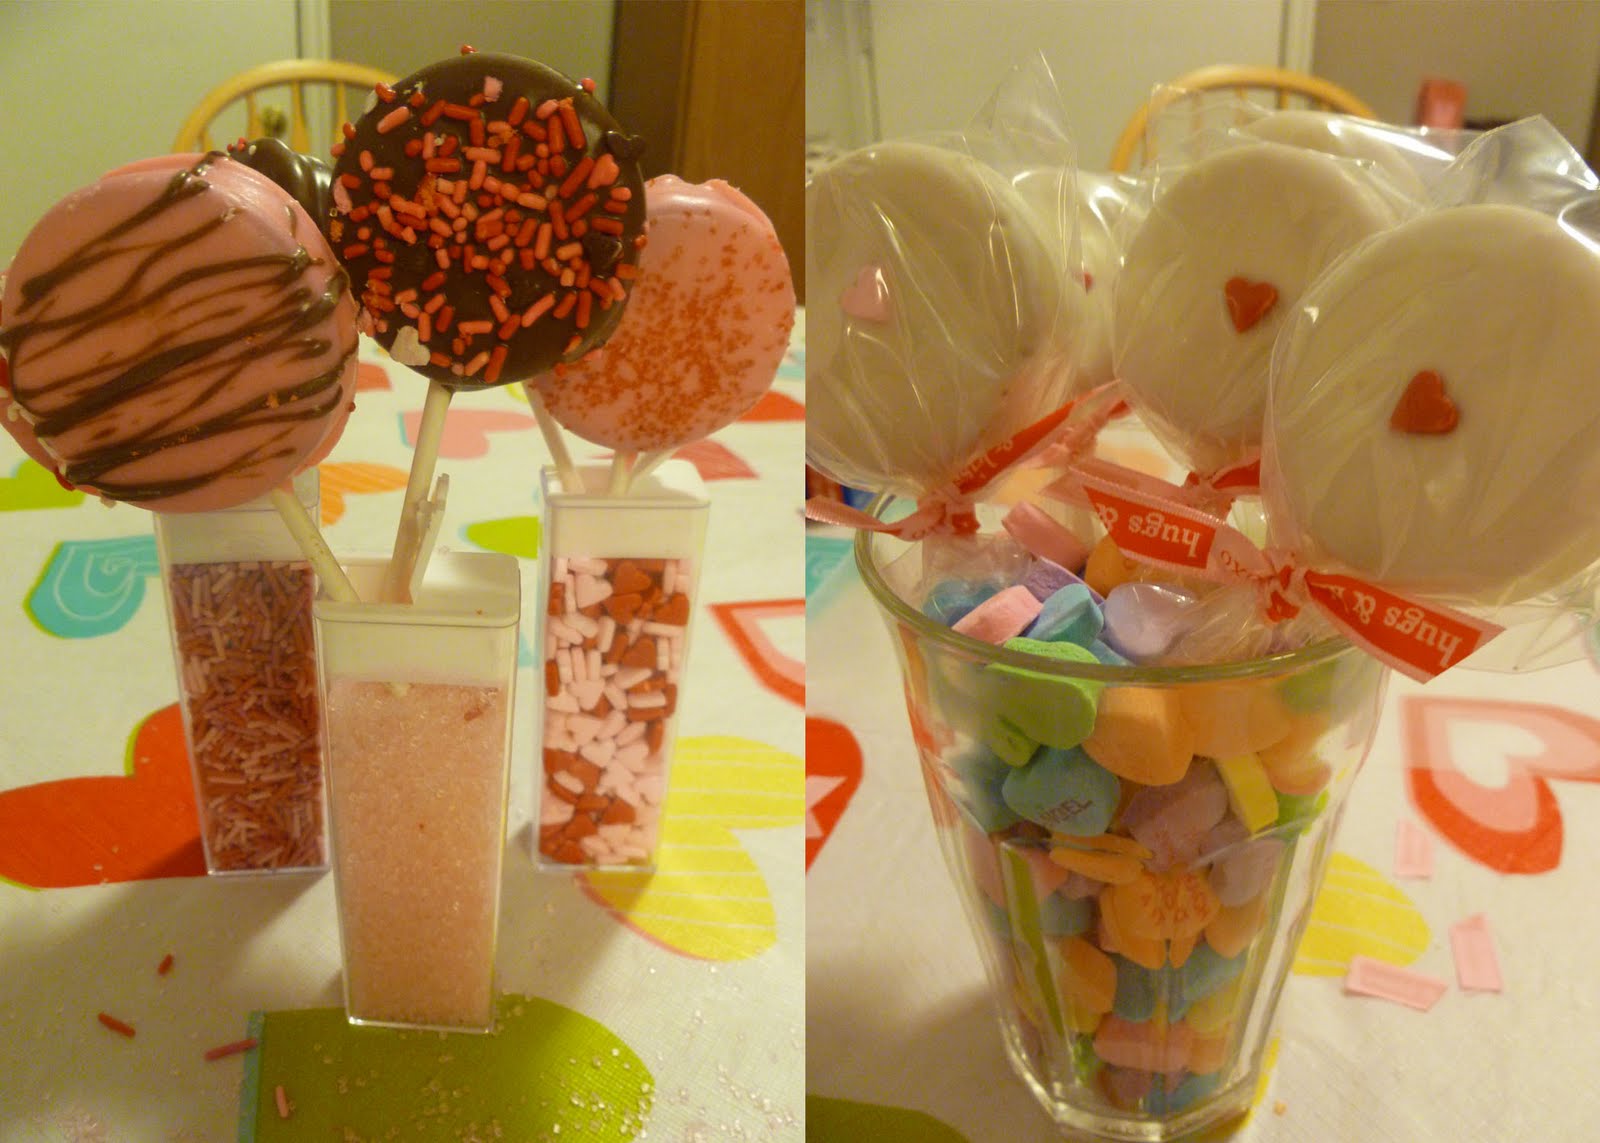
When I was growing up, I had one of those super cool Moms who made the thing that no one else was. I have seen several versions of the Oreo sucker or "pop" out there, but so far these are the best. They are easy, they hold together well and they are delicious. Besides, they have a lot of years of experience behind them, and nothing can beat that!
I haven't yet seen a Ritz cracker version so you'll have to take my word for it.... they are surprisingly delicious. I know what you're thinking. You're thinking, "what! A Ritz cracker? No way is that good." Well my husband said the same thing until I made him try it and now he loves it just as much as I do. In fact the Ritz cracker version was my favorite growing up. I know this recipe is a little behind schedule, obviously, but I still wanted to share it with you all. I made these to go with my daughters Valentines at preschool. The greatest thing about them is that they are inexpensive to make, so you can make a lot of them for very little! I remember my Mom made different versions throughout the year. For Easter she would put a sugar duck or bunny on top. So, ready to find out how to make your own Oreo and Ritz cracker pops? Well, here we go! Oh, and if you can't tell, the Oreo Pops are the picture on the left and the Ritz cracker pops are on the right. OK now, here we go!
RITZ CRACKER POP
Ingredients:
Ritz Crackers
Prepared Lemon Icing (I use the Betty Crocker one)
White Candy Melts (you can use almond bark, but I prefer the melts)
Sucker stick
Any candy or sugar embellishment
Directions:
1. Ice the back of a Ritz cracker. You really can't have too much icing, but you know, don't over do it. Place a sucker stick in the middle and then top with another Ritz cracker. Don't press down really hard because you'll break the cracker. Just enough so it will stick.
2. Repeat step one until you have as many pops as you would like. Then either let them set out until the frosting is firm enough to not fall apart, or to speed up the process you can put them in the refrigerator. This is what I would suggest doing.
3. Once the cookies are set up, Melt your white chocolate. Dip the cookies in the white chocolate, covering completely. This can get a little tricky. You really need to be as gentle as possible. Get off as much excess chocolate as possible. Place on wax or parchment paper to dry and set. If you want to add an embellishment, do so before the chocolate sets.
4. Once dry, everything holds together beautifully! I promise! I found some sucker bags at Wal-Mart, so I just packaged them up and tied them with a ribbon. You're all set to go! And believe me when I say that your kids will be the coolest ones in their class if they pass these little beauties out!
OREO POP
Ingredients:
Oreo Cookies
Any Color of Candy Melts (you can use chocolate or almond bark, but I prefer the melts)
Sucker stick
Any candy or sugar embellishment
Directions:
1. OK, so most people have a really hard time getting the stick into the middle without breaking the cookie, so here is the trick. You could buy Double Stuff Oreos, but it isn't completely necessary. Just take your cookies and put them in the microwave for about 5 to 10 seconds. If the middle is still not soft, microwave them again. It varies by microwave so I can't tell you an exact time. Once the middle is semi-soft, but not totally melted (watch that, it gets a little messy!) Slide your sucker stick into the middle.
2. Repeat this step until you get the number of cookies that you want. Put the cookies aside to firm up, or, to speed up the process, place them in the fridge. Make sure you don't skip this step no matter what. If you do, your cookie will most likely fall apart during the chocolate dipping. Don't ask how I know that, just take my word for it!
3. When the cookies are firm, melt your chocolate. I used Semi-sweet chocolate melts and white chocolate melts that I colored pink (the pink candy melts were gone - but they literally make almost every color!) Once melted dip your cookies into the chocolate, covering completely. Be as gentle as possible as you get off as much excess chocolate as you can. Place onto Wax or Parchment paper and let them dry. At this point, place any embellishment that you would like onto the cookie.
4. Once the chocolate is set you can package them up and give them out. I again used the sucker bags from Wal-Mart and ribbon. Once again, be prepared for the compliments, the adulation's, the praise, the.....well you get the picture!
Happy Making!
Monday, December 20, 2010
Christmas Snowballs
Hello! It's been a crazy time preparing for Christmas! Here is a slightly different twist on the chex "muddy buddy" recipe. We give it away as gifts every year! Enjoy!
8 cups (1 large box) Cocoa Puffs Cereal
1 bag (10 oz.) Peanut Butter Chips
1/2 cup butter
2 Tbsp. Light Corn Syrup
3 Cups Powdered Sugar-divided
In each of two gallon-size resealable ziploc bags, place 1-1/2 cups powdered sugar. Set aside. Either on the stove over medium heat, or in the microwave, stir and melt together the Peanut Butter Chips, butter and corn syrup until smooth. Pour over Cocoa Puffs in a large bowl and stir gently to coat. Divide the cocoa puff mixture evenly between the two ziploc bags of powdered sugar. Seal the bags and shake gently to coat with sugar. Spread onto waxed paper to cool.
Thursday, October 21, 2010
Halloween Menu

Because Halloween is on a Sunday this year, I decided that I wanted to make it special since we won't be trick-or-treating on that day. If you are like me, you have struggled to come up with a fun, yet not too creepy, but delicious, and something the kids will eat - meal to serve. It was especially difficult because everything that you find is usually an appetizer type food. Since we are having a few friends over for a sit-down dinner, I can't really just serve finger foods for the meal. Finally I have figured out what I am going to do. I wanted to share it with all of you so that if you are still looking, maybe I can help out with your meal plans.
Breakfast:
- Pancakes made into Halloween shapes
- Sausage "Fingers"
I came up with this idea when I was first introduced to Jim's Pancakes by a family member and then later when he appeared on the Rachel Ray show. His pancakes are awesome! I thought, "hey, I can do that!" So we will be attempting these pancakes in the morning.
Lunch
- Ghost of Monte Cristo Sandwiches. (Picture 5 above)
- PB&J sandwiches cut into shapes or Hot dog mummies. (Pictures 2 and 7)
The Monte Cristo will most likely be for the adults that will be visiting with us for lunch. I haven't quite decided between the mummies or the PB&J's, but these are for the kiddos.
Dinner:
- Martinelli's Apple Cider with eye ball drink stir-ers (found at Wal-mart)
- Mummy Meatloaf (picture 1 above)
- Mashed Boo-tatoes (picture 4 above)
- Slivered Scream Beans (picture 6 above)
- Witches Fingers (Bread sticks)
Ever since I first saw this meatloaf I wanted to make it. Everything else is really all about how you present it.
Dessert:
- Brain Cupcakes (picture 3 above)
- Homemade Oreos with Orange filling
- Candy Corn Trifles
We are having so many desserts because I want people to be able to choose what they want. We are also putting the kids to bed and then watching some type of scary movie - it is after all Halloween! I just want everyone to be fed and happy, plus the sugar will help keep all the adults awake!
The Oreos are our own recipe found here! For other really great ideas visit Family Fun and Martha Stewart. They have some really great entertaining ideas and awesome things that you can do with your kids! Good luck and Happy Halloween!
Tuesday, July 6, 2010
Easy Entertaining Idea: Trifle Bar!!!!!


This year for the fourth of July, Heather and I wanted to try something different and delicious for a dessert. A while ago, I read in Taste of Home about the idea of a trifle bar. I thought this would be fun. So we tried it, and it was a HUGE success for our barbecue, and very delicious! Plus, it was so little work, it made the day even better! For those non-triflers out there, according to google, a trifle is defined as: "a dessert dish made from thick (or often solidified) custard, fruit, sponge cake, fruit juice or, more recently, gelatin, and whipped cream. These ingredients are usually arranged in layers with fruit and sponge on the bottom, and custard and cream on top." We put out individual serving dishes for our guests, along with dishes of brownie cubes, angel food cake cubes, strawberries, blueberries, raspberries, vanilla pudding, and cool whip, and let them go to town. Since this was 4th of July, we went with the red-white-blue thing, but you can let your imagination go wild! Here are some suggestions:
Cakes:
Frozen (or homemade) pound cake cubes
Chocolate Cake cubes
Angel Food Cake cubes
Brownie Cubes
Yellow Cake Cubes
White Cake Cubes
Frozen (or homemade) pound cake cubes
Chocolate Cake cubes
Angel Food Cake cubes
Brownie Cubes
Yellow Cake Cubes
White Cake Cubes
Fruits:
Strawberries
Blackberries
Raspberries
Blueberries
Blackberries
Banana Slices
Mandarin Orange Segments
Kiwi Slices
Strawberries
Blackberries
Raspberries
Blueberries
Blackberries
Banana Slices
Mandarin Orange Segments
Kiwi Slices
Sauces/Custards:
Vanilla Pudding
Chocolate Pudding
White Chocolate Pudding
Cheesecake Pudding
Banana Cream Pudding
Favorite jam or jelly
Chocolate or Caramel Sauce
Vanilla Pudding
Chocolate Pudding
White Chocolate Pudding
Cheesecake Pudding
Banana Cream Pudding
Favorite jam or jelly
Chocolate or Caramel Sauce
Toppings:
Whipped Cream/Cool Whip
Yogurt
Raspberry Whipped cream (if you want to get extra fancy!) To make raspberry whipped cream: take one 10 oz. tub of frozen sweeetened raspberries in syrup, thawed, blend in blender for 30 seconds until pureed, strain and discard seeds, and stir in one 8 oz. tub of Cool Whip, and voila! Instant raspberry cream! :-)
Subscribe to:
Posts (Atom)