Thursday, March 24, 2011

Sweet Lemon Puffs


These tasty treats are absolutely scrumptious! We are visiting Aaron's sister this week and we made these for dessert. We couldn't even wait until we got home from California to post the recipe. To make enough for everybody, we doubled the recipe posted below. Enjoy!!!

1 sheet puff pastry dough (Pepperidge Farm), thawed
8 oz. cream cheese, softened
1/2 cup sugar
1 teaspoon lemon juice
1 egg
1 teaspoon vanilla

Unfold pastry sheet and cut into 9 squares. Put each individual square into a greased muffin tin, pressing gently into cup. Beat remaining ingredients together until smooth. Divide the filling between the 9 pastry squares. Bring corners of puff pastry together in the middle to enclose filling. Bake at 375 for 20-25 minutes. Remove from pan and sprinkle with powdered sugar.

Yield: 9 puffs.

Source: Lauren Nash (Aaron's Sister).

Friday, March 4, 2011

Oreo and Ritz Cracker Pops


When I was growing up, I had one of those super cool Moms who made the thing that no one else was. I have seen several versions of the Oreo sucker or "pop" out there, but so far these are the best. They are easy, they hold together well and they are delicious. Besides, they have a lot of years of experience behind them, and nothing can beat that!

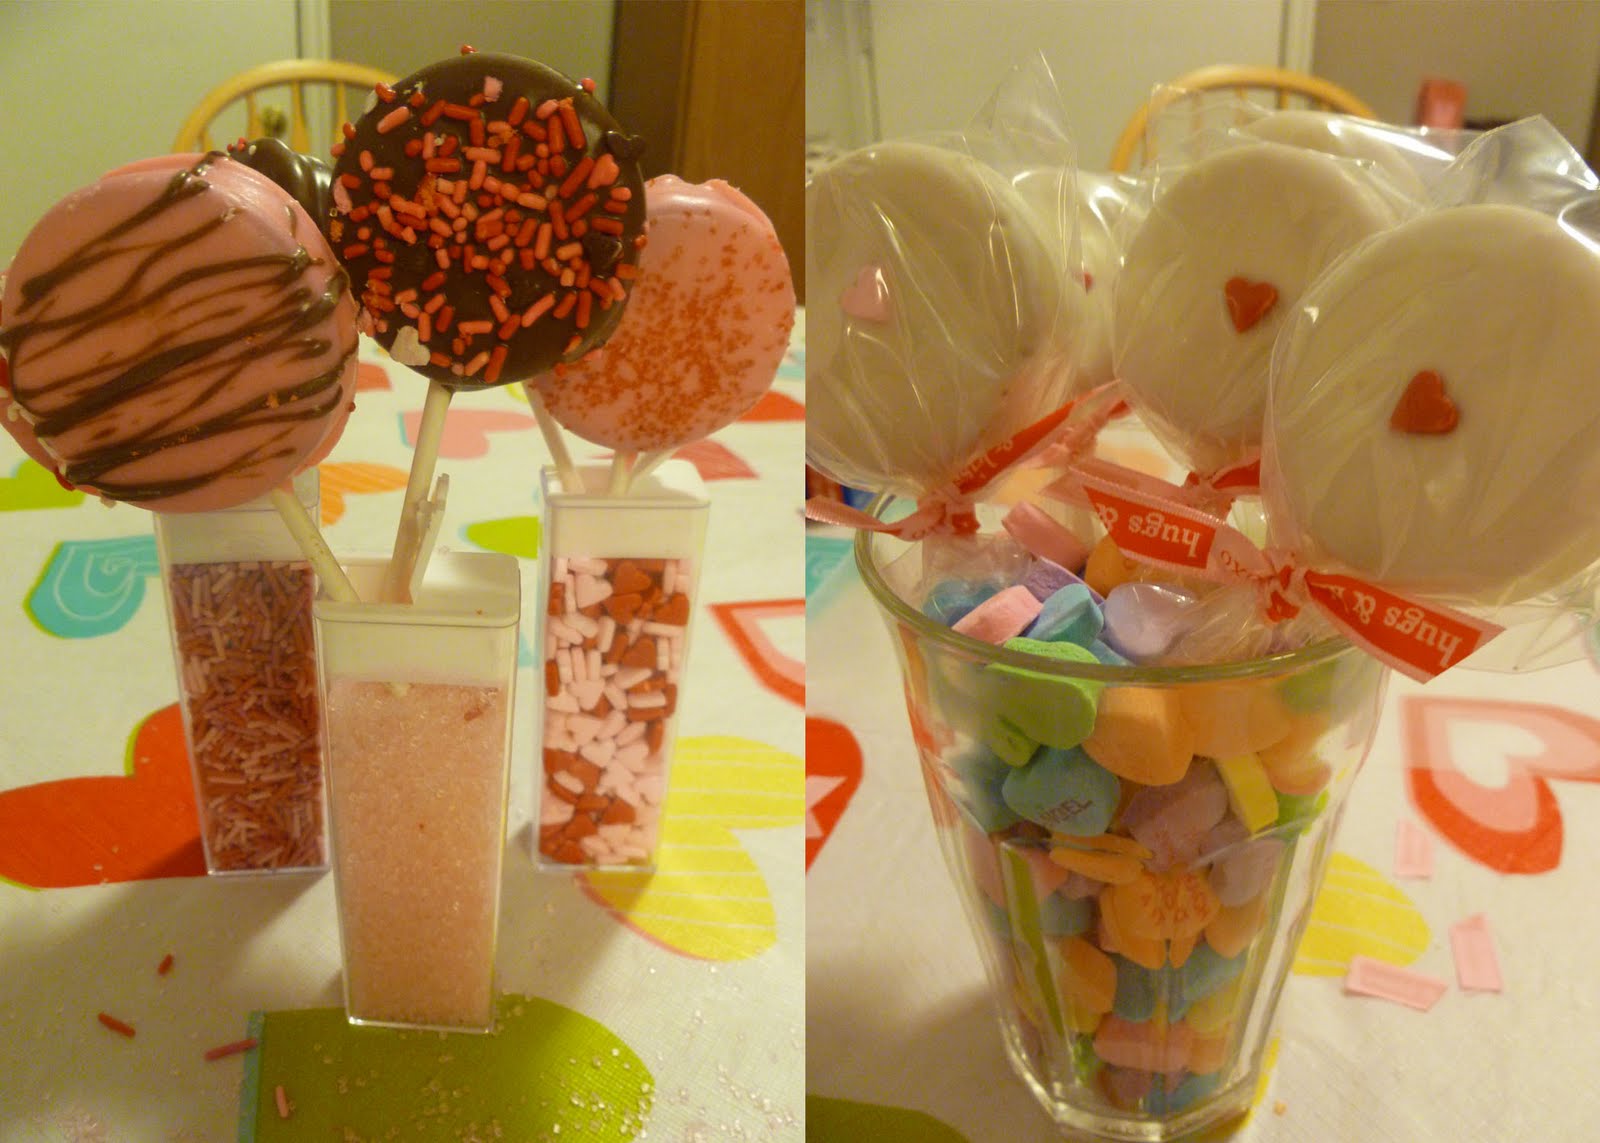
I haven't yet seen a Ritz cracker version so you'll have to take my word for it.... they are surprisingly delicious. I know what you're thinking. You're thinking, "what! A Ritz cracker? No way is that good." Well my husband said the same thing until I made him try it and now he loves it just as much as I do. In fact the Ritz cracker version was my favorite growing up. I know this recipe is a little behind schedule, obviously, but I still wanted to share it with you all. I made these to go with my daughters Valentines at preschool. The greatest thing about them is that they are inexpensive to make, so you can make a lot of them for very little! I remember my Mom made different versions throughout the year. For Easter she would put a sugar duck or bunny on top. So, ready to find out how to make your own Oreo and Ritz cracker pops? Well, here we go! Oh, and if you can't tell, the Oreo Pops are the picture on the left and the Ritz cracker pops are on the right. OK now, here we go!

RITZ CRACKER POP

Ingredients:

Ritz Crackers

Prepared Lemon Icing (I use the Betty Crocker one)

White Candy Melts (you can use almond bark, but I prefer the melts)

Sucker stick

Any candy or sugar embellishment

Directions:

1. Ice the back of a Ritz cracker. You really can't have too much icing, but you know, don't over do it. Place a sucker stick in the middle and then top with another Ritz cracker. Don't press down really hard because you'll break the cracker. Just enough so it will stick.

2. Repeat step one until you have as many pops as you would like. Then either let them set out until the frosting is firm enough to not fall apart, or to speed up the process you can put them in the refrigerator. This is what I would suggest doing.

3. Once the cookies are set up, Melt your white chocolate. Dip the cookies in the white chocolate, covering completely. This can get a little tricky. You really need to be as gentle as possible. Get off as much excess chocolate as possible. Place on wax or parchment paper to dry and set. If you want to add an embellishment, do so before the chocolate sets.

4. Once dry, everything holds together beautifully! I promise! I found some sucker bags at Wal-Mart, so I just packaged them up and tied them with a ribbon. You're all set to go! And believe me when I say that your kids will be the coolest ones in their class if they pass these little beauties out!

OREO POP

Ingredients:

Oreo Cookies

Any Color of Candy Melts (you can use chocolate or almond bark, but I prefer the melts)

Sucker stick

Any candy or sugar embellishment

Directions:

1. OK, so most people have a really hard time getting the stick into the middle without breaking the cookie, so here is the trick. You could buy Double Stuff Oreos, but it isn't completely necessary. Just take your cookies and put them in the microwave for about 5 to 10 seconds. If the middle is still not soft, microwave them again. It varies by microwave so I can't tell you an exact time. Once the middle is semi-soft, but not totally melted (watch that, it gets a little messy!) Slide your sucker stick into the middle.

2. Repeat this step until you get the number of cookies that you want. Put the cookies aside to firm up, or, to speed up the process, place them in the fridge. Make sure you don't skip this step no matter what. If you do, your cookie will most likely fall apart during the chocolate dipping. Don't ask how I know that, just take my word for it!

3. When the cookies are firm, melt your chocolate. I used Semi-sweet chocolate melts and white chocolate melts that I colored pink (the pink candy melts were gone - but they literally make almost every color!) Once melted dip your cookies into the chocolate, covering completely. Be as gentle as possible as you get off as much excess chocolate as you can. Place onto Wax or Parchment paper and let them dry. At this point, place any embellishment that you would like onto the cookie.

4. Once the chocolate is set you can package them up and give them out. I again used the sucker bags from Wal-Mart and ribbon. Once again, be prepared for the compliments, the adulation's, the praise, the.....well you get the picture!

Happy Making!

Monday, February 28, 2011

Fudge Puddles


So Aaron bought the cookbook that we got this recipe out of. I must say that I was so excited to try this one out. It is like chocolate and peanut butter decadence all rolled into one! These are definitely for those days when you just need that chocolate fix but you don't want to feel too bad about what you are eating. It is especially good for those days when you go to your closet looking to wear that pair of fat jeans you've been saving only to realize that your fat jeans are now your regular every day jeans, and now you have to eat your sorrow away. You girls follow me? Anyway, try them out. They are delicious.

Ingredients:
1/2 cup butter, softened
1/2 cup creamy peanut butter
1/2 cup sugar
1/2 cup packed light brown sugar
1 egg
1/2 teaspoon vanilla
1-1/4 cups all-purpose flour
3/4 teaspoon baking soda
1/2 teaspoon salt

FUDGE FILLING:
1 cup milk chocolate chips
1 cup semisweet chocolate chips
1 can (14 ounces) sweetened condensed milk
1 teaspoon vanilla

chopped peanuts

In a large bowl, cream the butter, peanut butter, and sugars. Beat in egg and vanilla. Combine the flour, baking soda and salt. Gradually add to creamed mixture. Chill for one hour.

Shape mixture into 48 balls, 1 inch each. Place balls in lightly greased mini-muffin tins. Bake at 325 for 14-16 minutes or until lightly browned. Using the end of a wooden spoon handle, make a 3/8-1/2 inch deep indentation in the center of each ball. Cool in pans for 5 minutes before removing to wire racks to cool completely.

For filling, in a microwave or small saucepan, melt chocolate chips. Stir in milk and vanilla until smooth. Fill each shell with chocolate filling. Sprinkle with chopped peanuts. (Any leftover chocolate filling can be stored in the fridge and served later warmed over ice cream).

Source: TOH Most Requested Recipes

Wednesday, February 16, 2011

Hamburger Noodle Casserole


This is an easy version of "Homemade Hamburger Helper." It doesn't take very long, and you know exactly what's in it, without having to worry about preservatives and additives, etc. You can even make this in a lighter version by using reduced fat or fat free cream cheese, ricotta, sour cream and cheddar cheese, as noted below. This makes a great weeknight family entree.

5 cups uncooked egg noodles
1-1/2 pounds lean ground beef
2 garlic cloves, minced
3 cans (8 ounces each) tomato sauce (we actually thought it looked a little dry when we made it the first time, so we added an additional 1/2 can or so.)
1/2 teaspoon sugar
1/2 teaspoon salt
1/8 teaspoon pepper
1 package (8 ounces) cream cheese (reduced fat or fat free if preferred)
1 cup ricotta cheese (reduced fat or fat free if preferred)
1/4 cup sour cream (reduced fat or fat free if preferred)
3 green onions, thinly sliced, divided
2/3 cup shredded cheddar cheese (more if you like it really cheesy. Again, low fat, if desired)

Cook noodles according to package directions. Meanwhile, in a large nonstick skillet over medium heat, cook beef and garlic until meat is no longer pink; drain. Stir in the tomato sauce, sugar, salt, and pepper; heat through. Drain noodles; stir into beef mixture.

In a small bowl, beat the cream cheese, ricotta cheese, and sour cream until well blended. Stir in half of the onions.

Spoon half of the noodle mixture into a 9x13 baking dish coated with cooking spray. Top with the cheese mixture and remaining noodle mixture.

Cover and bake at 350 for 30 minutes. Uncover; sprinkle with cheese. Bake for 5-10 minutes longer or until thoroughly heated and the cheese is melted. Sprinkle with the remaining green onions.

Yield: Approx. 10 servings

Source: TOH Most Requested Recipes

Wednesday, February 9, 2011

Taco Chicken Rolls


Here's another tasty 5 ingredient fix for chicken! If you don't like the green chilies, you can replace it with finely chopped broccoli, or whatever you prefer.

1 cup finely crushed cheese-flavored crackers (Cheez-its, Goldfish, Better Cheddars, whatever).
1 envelope taco seasoning (about 1/4 cup-we buy this in bulk at Costco)
6 boneless, skinless chicken breast halves (about 4 ounces each)
2 ounces Monterey Jack Cheese, cut into six 2 inch x 1/2 inch sticks (we just used plain ol' cheddar to avoid an unnecessary trip to the store - worked great.)
1 can (4 ounces) chopped green chilies

In a shallow dish, combine cracker crumbs and taco seasoning; set aside. Flatten chicken between two sheets of waxed paper or plastic wrap to about 1/4 inch thickness (we found the easiest way is just to whack with a rolling pin since we don't have a meat mallet). Place a cheese stick and about 1 tablespoon of chilies on each piece of chicken. Tuck ends of chicken in and roll up. Secure with a toothpick.

Coat chicken rolls with crumb mixture. Place in a greased 9 x 13 baking dish. Bake, uncovered, at 350 for 35-40 minutes or until chicken is no longer pink. (Don't forget to remove toothpicks before serving!!)

Yield: 6 servings

Source: TOH Most Requested Recipes

"Can't Leave Alone" Bars


We have a lot of cake mix on hand in our pantry since we bought an entire case of it at a local case lot sale this fall. We started getting tired of just making cakes. Then, we discovered these amazing, gooey, chewy bars. You literally can't leave them alone. They are so good, have only 6 ingredients, and nobody will ever think that it starts with a white cake mix!!

1 box (18-1/4 ounces) white cake mix
2 eggs
1/3 cup oil
1 can (14 ounces) sweetened condensed milk
1 cup (6 ounces) semisweet chocolate chips
1/4 cup butter, cubed

In a large bowl, combine cake mix, eggs, and oil. Press two-thirds of the mixture into a greased 9 x 13 baking pan. Set the remaining cake mixture aside.

In a microwave-safe bowl, combine the milk, chocolate chips, and butter. Microwave, uncovered, until chips and butter are melted; stir until smooth. Pour over crust.

Drop teaspoonfuls of remaining cake mixture over top. Bake at 350 for 20-25 minutes or until lightly browned. Cool before cutting.

Yield: 3 dozen.

Source: TOH Most Requested Recipes

Chicken and Dumpling Casserole


Heather and I love warm, rich comfort food on a cold, snowy winter night. On just such a night a while ago, we gave this recipe a try. Absolutely delicious. Heather especially loved it because she is a big fan of basil, and this recipe has a lot of it!

1/2 cup chopped onion
1/2 cup chopped celery
2 garlic cloves, minced
1/4 cup butter
1/2 cup all-purpose flour
2 teaspoons sugar
1 teaspoon salt
1 teaspoon dried basil
1/2 teaspoon pepper
4 cups chicken broth
1 package (10 ounces) frozen green peas (we happened to have frozen peas and carrots on hand, it worked great.)
4 cups cubed cooked chicken

Dumplings:
2 cups bisquick
2 teaspoons dried basil
2/3 cup milk

In a large saucepan, saute the onion, celery and garlic in butter until tender. Stir in the flour, sugar, salt, basil and pepper until blended. Gradually add broth and bring to a boil. Cook and stir for 1 minute; reduce heat. Add the peas and cook for 5 minutes, stirring constantly. Stir in chicken. Pour into a greased 9 x 13 inch baking dish.

For dumplings: in a small bowl combine bisquick and basil. Stir in milk with a fork until moistened. Drop by tablespoonfuls into 12 mounds over chicken mixture.

Bake, uncovered, at 350 for 30 minutes. Cover and bake 10 minutes longer or until a toothpick inserted in a dumpling comes out clean. 6-8 servings.

Source: TOH Most Requested Recipes.